 Velo Workspaces
Why run an AI agent in a VM on macOS
If you've used an AI coding agent — Open Interpreter, a LangChain agent, Claude Code, anything that executes LLM-generated code via subprocess/exec() — you've implicitly accepted that it can do anything your user account can do. That's not a hypothetical risk: Docker's own engineering blog has documented real AI coding agent security incidents, and indirect prompt injection makes it worse than "the agent might make a mistake," because a malicious instruction hidden in a file the agent reads can trigger commands with your full permissions. Many posts on Medium, like "Nobody is Ready for These Security Risks of AI Agents," lay out the same concern.
The obvious fix is to run the agent in a VM — it provides a true hardware-isolated boundary.
Choosing a VM app
Apple's Virtualization.framework doesn't expose the host GPU to a Linux guest. Run your model inside the VM under that constraint and you're CPU-bound only, which for a 7B+ model is a real, felt slowdown, not a minor inconvenience. So the actual goal of this guide is narrower than "put the agent in a VM": keep the model on the host's GPU, keep only the agent's code execution inside the VM, and connect the two fast enough that the split doesn't cost you anything you'd notice. Velo Workspaces has a fast, purpose-built channel, AI Bridge, for exactly this split.
┌───────────────────────────────────────────────────────────────────┐
│                            macOS HOST                             │
│                                                                   │
│      Ollama / MLX Engine   ───►  Storage: ~/.ollama/models        │
│      (Native Metal GPU)          (single 10GB–50GB copy)          │
│              ▲                                                    │
│              │  Velo Workspaces AI Bridge                         │
│              │  proxies to localhost:<port>                       │
│              ▼                                                    │
│      ┌─────────────────────────────────────────────────────┐      │
│      │                     LINUX VM                        │      │
│      │  socat 127.0.0.1:<port>  ⇄  vsock CID 2             │      │
│      │  Env: OPENAI_API_BASE=http://127.0.0.1:<port>/v1    │      │
│      │  Dev apps / Docker containers / VS Code / Python    │      │
│      └─────────────────────────────────────────────────────┘      │
└───────────────────────────────────────────────────────────────────┘Setup
Install an MLX server on the host
To install MLX on macOS, you must first install a modern version of Python (3.10 or newer) using Homebrew. The Python version bundled with macOS developer tools is outdated.
Install Homebrew (if you don't have it):
/bin/bash -c "$(curl -fsSL https://raw.githubusercontent.com/Homebrew/install/HEAD/install.sh)"Install Python 3.12 and create a virtual environment.
brew install python@3.12
python3.12 -m venv ~/.venv
Install MLX-LM via pip and run the local server inside the virtual environment.
source ~/.venv/bin/activate
pip install --upgrade pip
pip install mlx-lm
mlx_lm.server --model mlx-community/Qwen2.5-Coder-7B-Instruct-4bit --port 8080
Create the VM
Open the Velo Workspaces app, choose AI Workspace in the sidebar, click + in the upper right and pick an image source: download an official image, choose a local OS image file, or boot from an existing virtual disk. Let's pick Ubuntu Server 26.04 as an example, which boots faster and uses less RAM for the OS itself.
Then choose the AI Sandbox profile, click "Show Advanced Settings", configure CPU, memory and storage size, ensure AI Bridge is selected and Host Provider is MLX.
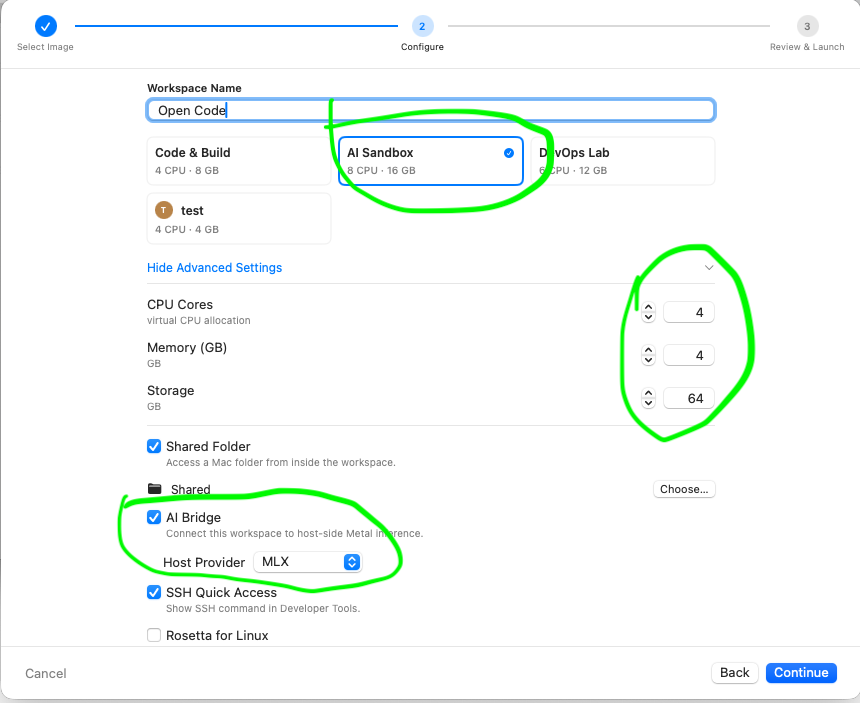
Click Continue to install the guest OS.
Configure AI Bridge inside the VM
After the guest OS finished the installation, open a terminal of the guest OS, or SSH into the guest OS, install socat and create a service to forward the traffic on 127.0.0.1:8080 into AI Bridge.
sudo apt update
sudo apt install -y socat
sudo tee /etc/systemd/system/velo-ai-bridge.service >/dev/null <<'EOF'
[Unit]
Description=Velo Workspaces AI Bridge (127.0.0.1:8080 to the host over the high speed channel)
After=network.target

[Service]
ExecStart=/usr/bin/socat TCP-LISTEN:8080,fork,reuseaddr,bind=127.0.0.1 VSOCK-CONNECT:2:8080
Restart=always
RestartSec=2

[Install]
WantedBy=multi-user.target
EOF
sudo systemctl daemon-reload
sudo systemctl enable velo-ai-bridge
sudo systemctl restart velo-ai-bridge
Install OpenCode in the VM
Install curl along with git and build-essential (which OpenCode often leverages when compiling or managing local repositories), then install the OpenCode terminal agent using its official standalone shell script — the fastest universal way to get it running on Ubuntu:
sudo apt install -y curl git build-essential
curl -fsSL https://opencode.ai/install | bash
After the script finishes, update your current shell environment so your system recognizes the new opencode binary path:
source ~/.bashrcCreate the configuration file:
mkdir -p ~/.config/opencode
nano ~/.config/opencode/opencode.json
Paste the configuration below into the file.
{
  "$schema": "https://opencode.ai/config.json",
  "provider": {
    "mlx-local": {
      "npm": "@ai-sdk/openai-compatible",
      "name": "MLX Local Server",
      "options": {
        "baseURL": "http://127.0.0.1:8080/v1"
      },
      "models": {
        "mlx-community/Qwen2.5-Coder-7B-Instruct-4bit": {
          "name": "Qwen 2.5 Coder 7B (4-bit)"
        }
      }
    }
  },
  "model": "mlx-local/mlx-community/Qwen2.5-Coder-7B-Instruct-4bit"
}
Launch OpenCode:
opencodeOnce inside the OpenCode terminal user interface (TUI), open the connection wizard by typing:
/connectType MLX Local Server and select it, and when prompted for an API key, simply type mlx.
Now you have a fully local AI agent — both the underlying LLM and the agent entirely on your own hardware, for absolute privacy and zero API cost.
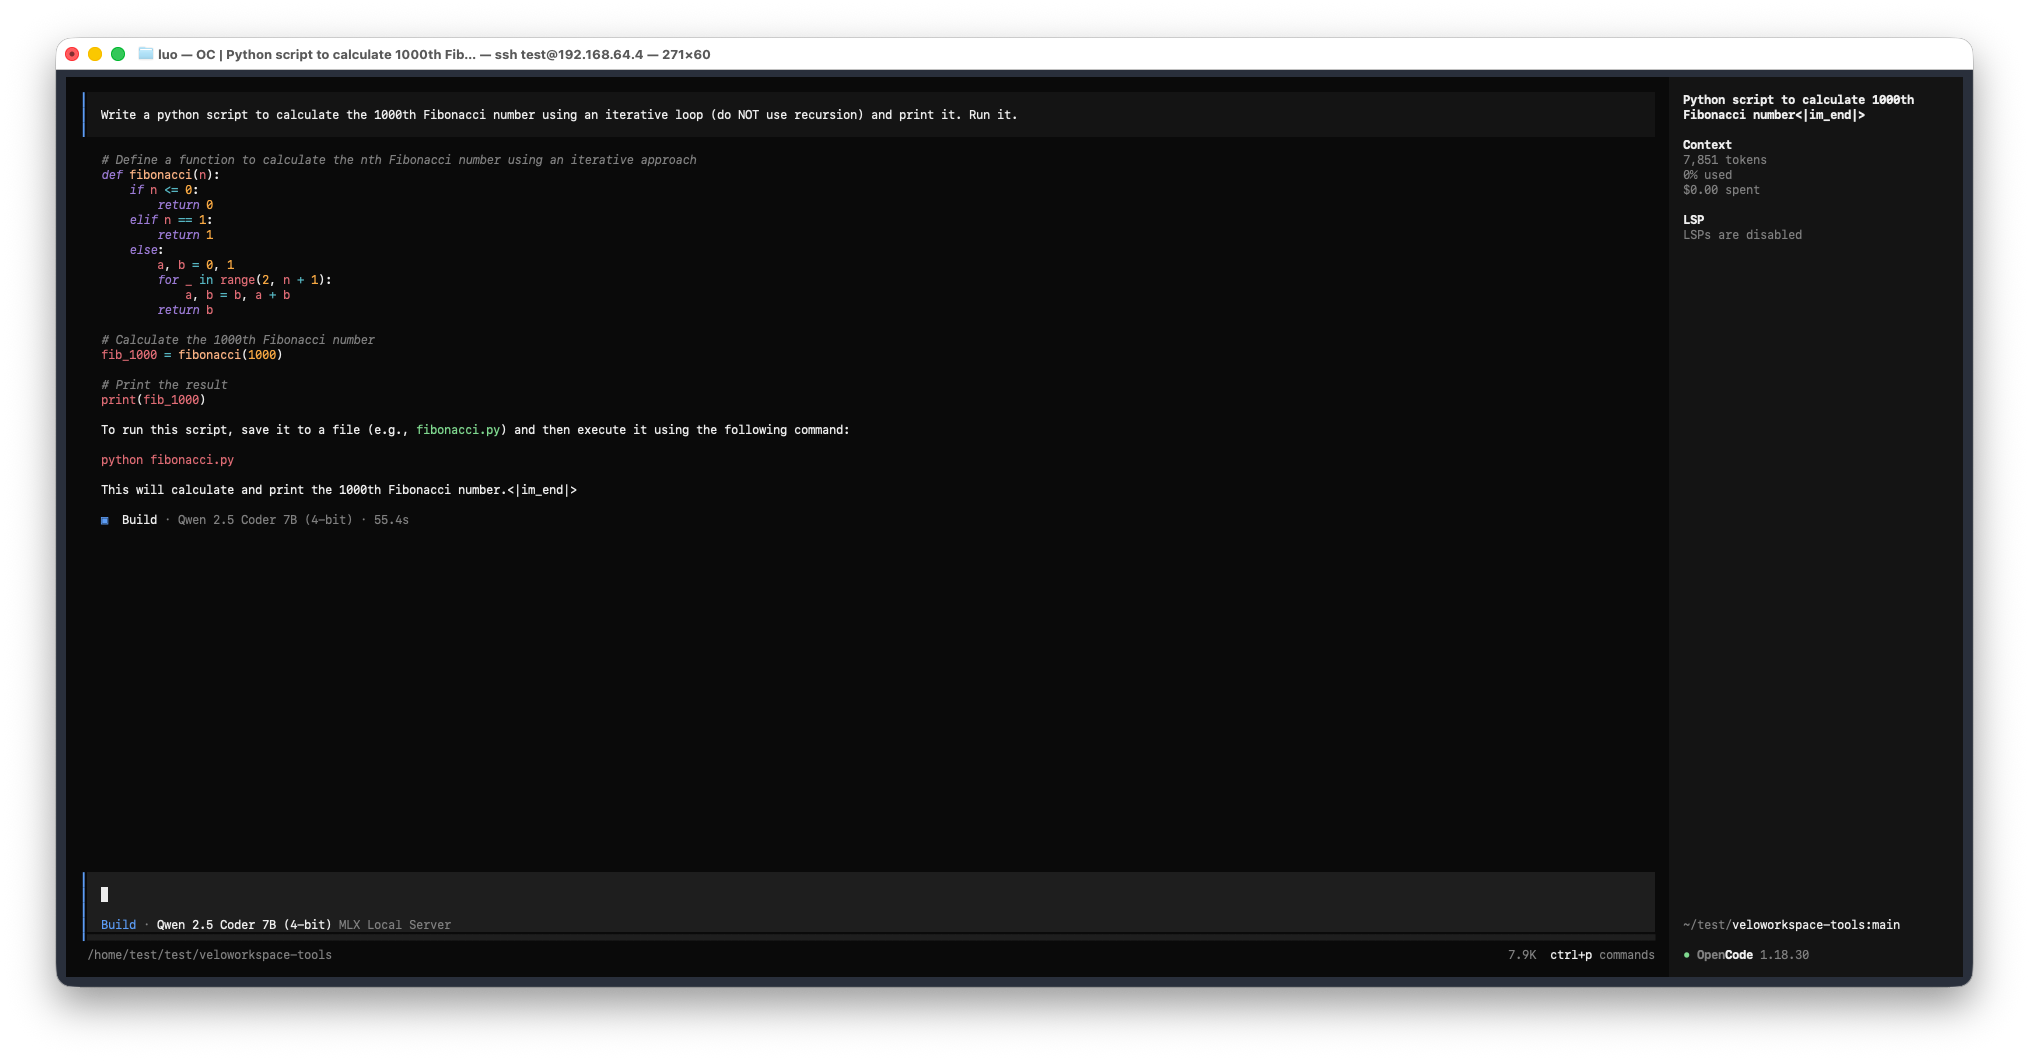
Curious what this setup actually costs in raw inference speed? See the full MLX benchmark write-up, or read the architecture behind AI Bridge. Or just download Velo Workspaces and try it yourself.