 Velo Workspaces
1. Introduction: The Security vs. Performance Dilemma
Running autonomous AI coding agents natively on your primary macOS machine introduces severe security liabilities. Modern agents execute terminal commands, install unverified dependencies via pip and npm, modify arbitrary files, and can be coerced through prompt injection attacks into exfiltrating environment variables, dotfiles, or macOS Keychain secrets.
The standard industry remedy is sandboxing agents inside a Linux virtual machine or container. On Apple Silicon, however, this immediately collides with a hypervisor-level barrier:
- No Compute Passthrough: Apple's native
Virtualization.frameworkdoes not expose the host Metal GPU to Linux guests. Linux VMs receive only a 2D paravirtualized framebuffer (virtio-gpu). - The "Virtualization Tax": Attempting to run an LLM directly inside a Linux VM forces model inference onto virtualized CPU cores. Generation speeds crater by 80%+, making multi-turn agentic loops unusable.
- Containers Share the Same Limitation: Docker Desktop, OrbStack, and Colima run atop Linux guest kernels and face the exact same GPU compute void.
The Decoupled Solution: Velo Workspaces AI Bridge
Velo Workspaces resolves this trade-off by separating the agent execution environment from the model inference engine:
- Model on the Host: An inference server — Ollama or Apple MLX — runs natively on macOS, retaining full access to unified memory bandwidth and Metal GPU acceleration.
- Agent in the VM: The agent framework executes inside an isolated Ubuntu Linux guest, restricting all file modifications and terminal execution to a sandboxed filesystem.
- VirtIO-vsock Transport: Traffic travels across hypervisor memory buffers via vsock rather than a traditional virtualized NAT network stack, reducing bridge overhead to single-digit milliseconds.
This guide covers both engines side by side. Pick one in Section 5 — everything downstream (VM setup, the vsock bridge, agent configuration) works identically either way, substituting the port your chosen engine listens on.
| MLX | Ollama | |
|---|---|---|
| Default port | 8080 | 11434 |
| Model source | huggingface.co/models?library=mlx-lm | ollama.com/library |
| Best for | Apple Silicon-native performance, the widest current selection of day-one MLX-quantized releases | The simplest one-command setup and model management (ollama pull, ollama run) |
2. Architecture Topology
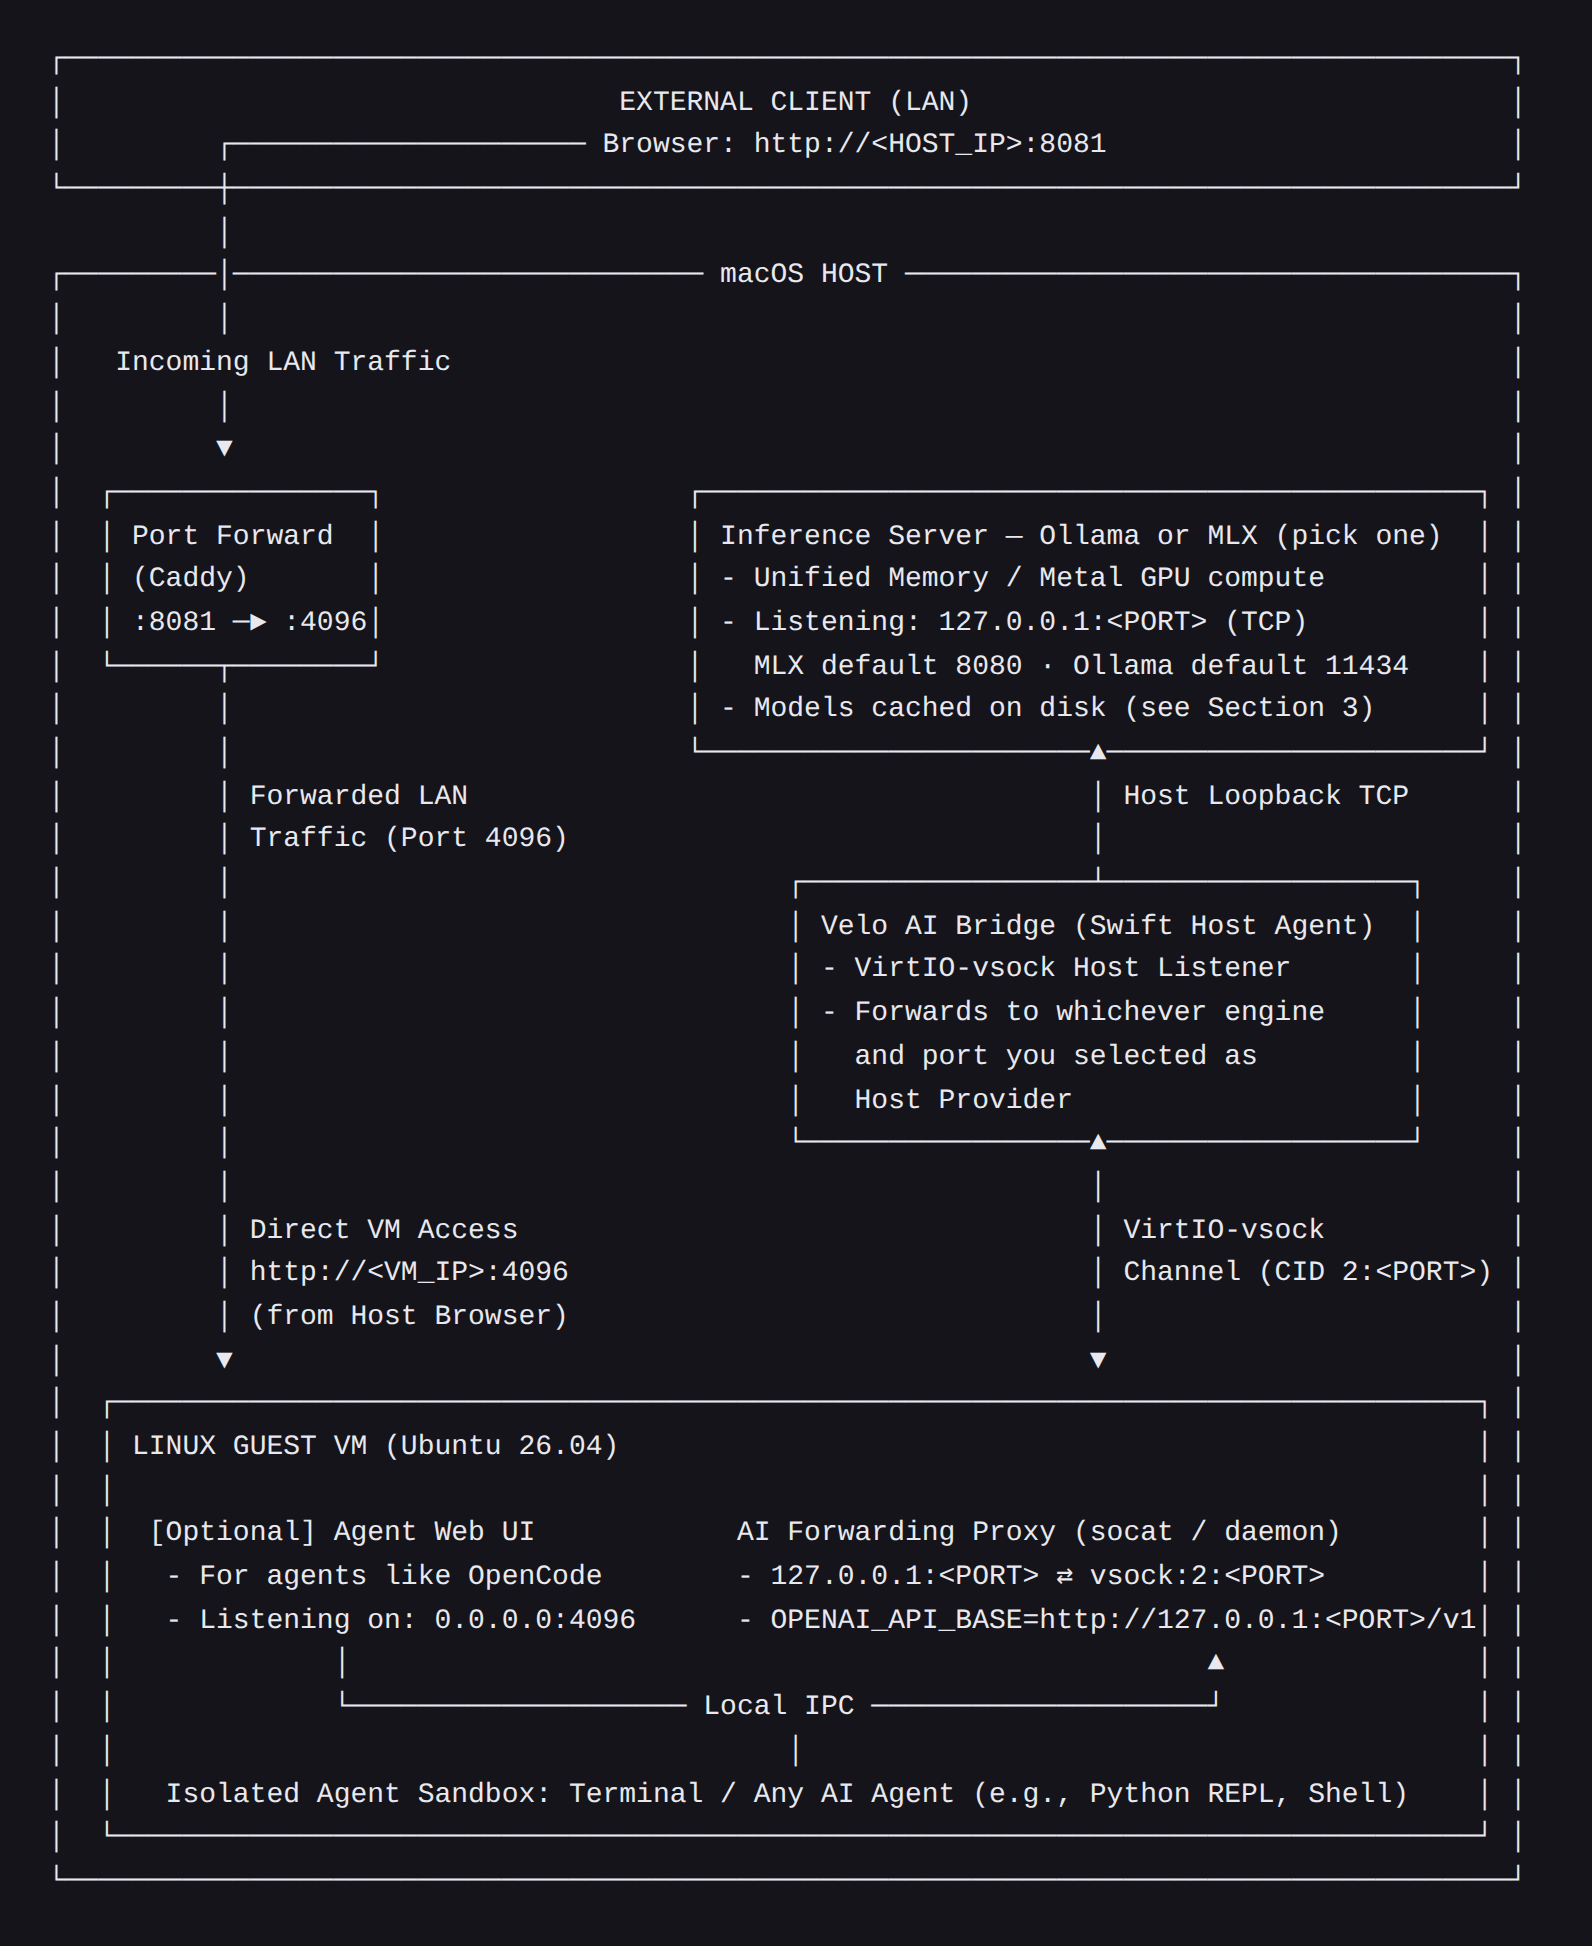
Network Flow Breakdown
- Inference Path: The agent sends standard OpenAI-compatible HTTP requests to
127.0.0.1:<PORT>inside the VM —8080for MLX,11434for Ollama. The localsocatproxy routes this payload across vsock to the host. The Swift AI Bridge receives the connection and relays it to whichever engine you selected as the workspace's Host Provider. - Host UI Access: The host browser connects directly to the guest's virtual interface via
http://<VM_IP>:4096over the standard hypervisor bridge. - External LAN Access: Because external machines cannot route directly to the VM's private virtual subnet, the host forwards an external port (
8081) to the guest's Web UI port (4096). Port8081is used to avoid colliding with whichever inference port (8080or11434) the host is already using.
3. Choose Your Model (Purpose and Host RAM Requirements)
Both engines use macOS Unified Memory dynamically. Because the OS, display compositor, and the model's KV cache share this pool, reserve at least 20–25% of total host RAM for operating overhead.
Model identifiers below are verified as of this writing — always confirm current availability and exact tags at huggingface.co/models?library=mlx-lm (MLX) or ollama.com/library (Ollama) before pulling, since libraries change.
| Mac Unified RAM | MLX (Hugging Face) | Ollama (ollama pull ...) | Quant | Use Case |
|---|---|---|---|---|
| 16 GB | mlx-community/Qwen2.5-Coder-7B-Instruct-4bit |
qwen2.5-coder:7b |
4-bit | Fast code completion, lightweight script generation, single-file edits. |
| 24 GB / 32 GB | mlx-community/Qwen2.5-Coder-32B-Instruct-4bitmlx-community/Mistral-Small-24B-Instruct-4bit |
qwen2.5-coder:32bmistral-small |
4-bit | Multi-file reasoning, refactoring, and debugging complex logic. |
| 36 GB / 48 GB | mlx-community/Qwen3.8-27B-4bit* |
qwen3.8:27b* |
4-bit | Advanced agentic tasks, architectural design, repository-wide indexing. |
| 64 GB / 96 GB | mlx-community/Llama-3.3-70B-Instruct-4bit |
llama3.3:70b |
4-bit | Deep reasoning, zero-shot full repository synthesis, complex planning. |
| 128 GB+ | mlx-community/Qwen3.8-2.4T-A95B-*bit*deepseek-ai/DeepSeek-V3* |
deepseek-v3* |
1–4-bit | Full-scale autonomous pipelines, heavy concurrent agent swarms. |
* Very recent (2026) or very large releases — check the library link for the exact current tag/quantization before pulling; MLX and Ollama conversions can lag a new release by days to weeks.
4. VM Sizing Guidelines
Because the heavy LLM weights and KV caches stay in macOS unified memory, the Linux VM only needs enough resources to execute the code generated by the agent.
Important (Session Longevity): Long-running autonomous sessions gradually leak resources. Agents continuously generate temporary files, compile dependencies, bloat pip/npm caches, and retain execution logs. Allocate extra memory buffers for long-lived environments to keep the Linux Out-Of-Memory (OOM) killer from terminating tasks.
| Scenario | vCPUs | Memory | Storage | Primary Workloads & Rationale |
|---|---|---|---|---|
| Ephemeral / Light Automation | 2 | 2–3 GB | 15–20 GB | CLI automation and simple scripts. Ideal for short-lived, disposable tasks. |
| Full-Stack Web Development | 4 | 4–6 GB | 30–40 GB | Node.js, Django, SQLite, Vite. Accommodates build tools and background servers. |
| Long-Running Agent Sessions | 4–6 | 8–12 GB | 50–60 GB | Continuous autonomous loops. Buffers memory against cached artifacts and logs. |
| System Programming & Docker | 6–8 | 12–16 GB | 60–80 GB | Rust/Go/C++ compilation, Docker-in-VM services. Prevents compilation lockups. |
5. Install the Inference Engine on the macOS Host
Pick one engine. All steps in this section run in the macOS Terminal on the host.
5.1 Option A — MLX
Install the official Apple MLX language model package using Python (3.10+):
# Create and activate an isolated virtual environment
python3 -m venv ~/.mlx-env
source ~/.mlx-env/bin/activate

# Install the MLX LM server package
pip install --upgrade mlx-lm
Launch the server bound to loopback (127.0.0.1) on port 8080. It downloads the model from Hugging Face automatically on first run. mlx-community/Qwen2.5-Coder-7B-Instruct-4bit below is just an example — swap in whichever tag you picked for your RAM tier in Section 3:
mlx_lm.server \
  --model mlx-community/Qwen2.5-Coder-7B-Instruct-4bit \
  --host 127.0.0.1 \
  --port 8080
In a second macOS terminal, verify it's responding to OpenAI-compatible requests:
curl -s http://127.0.0.1:8080/v1/models | grep "id"5.2 Option B — Ollama
Install Ollama from ollama.com (or brew install ollama). qwen2.5-coder:7b below is just an example — pull whichever tag you picked for your RAM tier in Section 3 instead:
brew install ollama
ollama serve &          # or just launch the Ollama app — it runs this for you
ollama pull qwen2.5-coder:7b
Ollama listens on 127.0.0.1:11434 by default. Verify it's responding:
curl -s http://127.0.0.1:11434/v1/models | grep "id"6. Create a VM in Velo Workspaces
- Launch Velo Workspaces on macOS.
- Choose AI Workspace in the sidebar, click + in the upper right.
- Pick an image source: download an official image, choose a local OS image file, or boot from an existing virtual disk. Let's pick Ubuntu 26.04 LTS (Server or Desktop).
- Choose the AI Sandbox profile, click "Show Advanced Settings".
- Assign hardware parameters based on the sizing guidelines in Section 4 (e.g., 4 vCPUs, 6 GB RAM, 40 GB Disk). Ensure AI Bridge is checked and Host Provider matches whichever engine you started in Section 5 — MLX or Ollama.
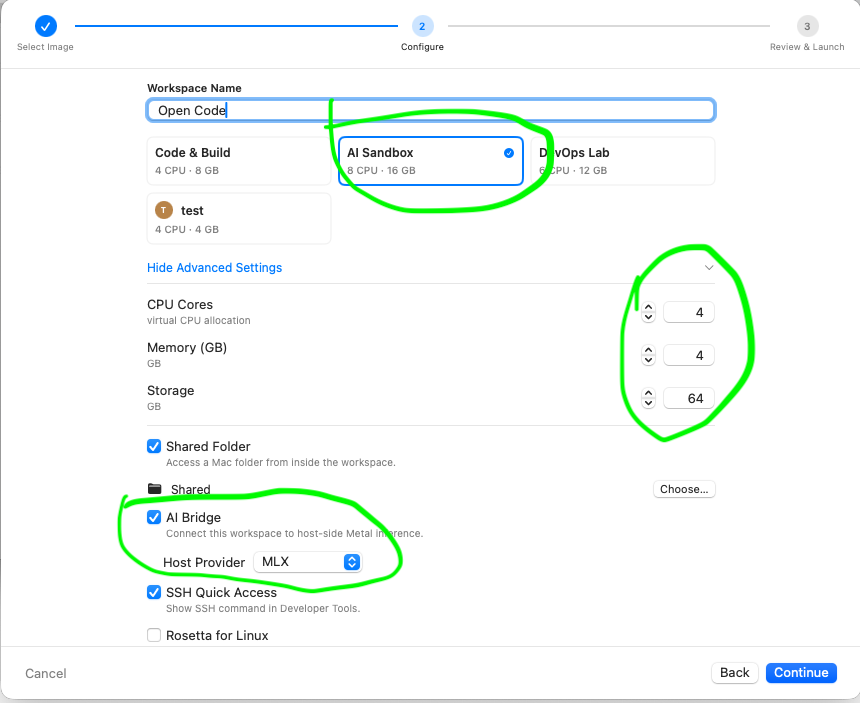
Click Continue, install the guest OS, then start the virtual machine and log in.
7. Install and Configure AI Agents inside the VM
All steps in this section run in the Ubuntu Linux Terminal inside the VM. Throughout, <PORT> is 8080 for MLX or 11434 for Ollama — whichever you picked in Section 5.
7.1 Establish the Guest Vsock Proxy
Rather than typing this by hand, open the running workspace's AI Bridge tab in Velo Workspaces — it shows your exact port already filled in, with a Copy button on each command block. Run step 1, then either step 2 (forwards for the life of this terminal session — simplest, good for a quick test) or step 3 (installs it as a systemd service that survives reboots — better for anything you'll come back to):
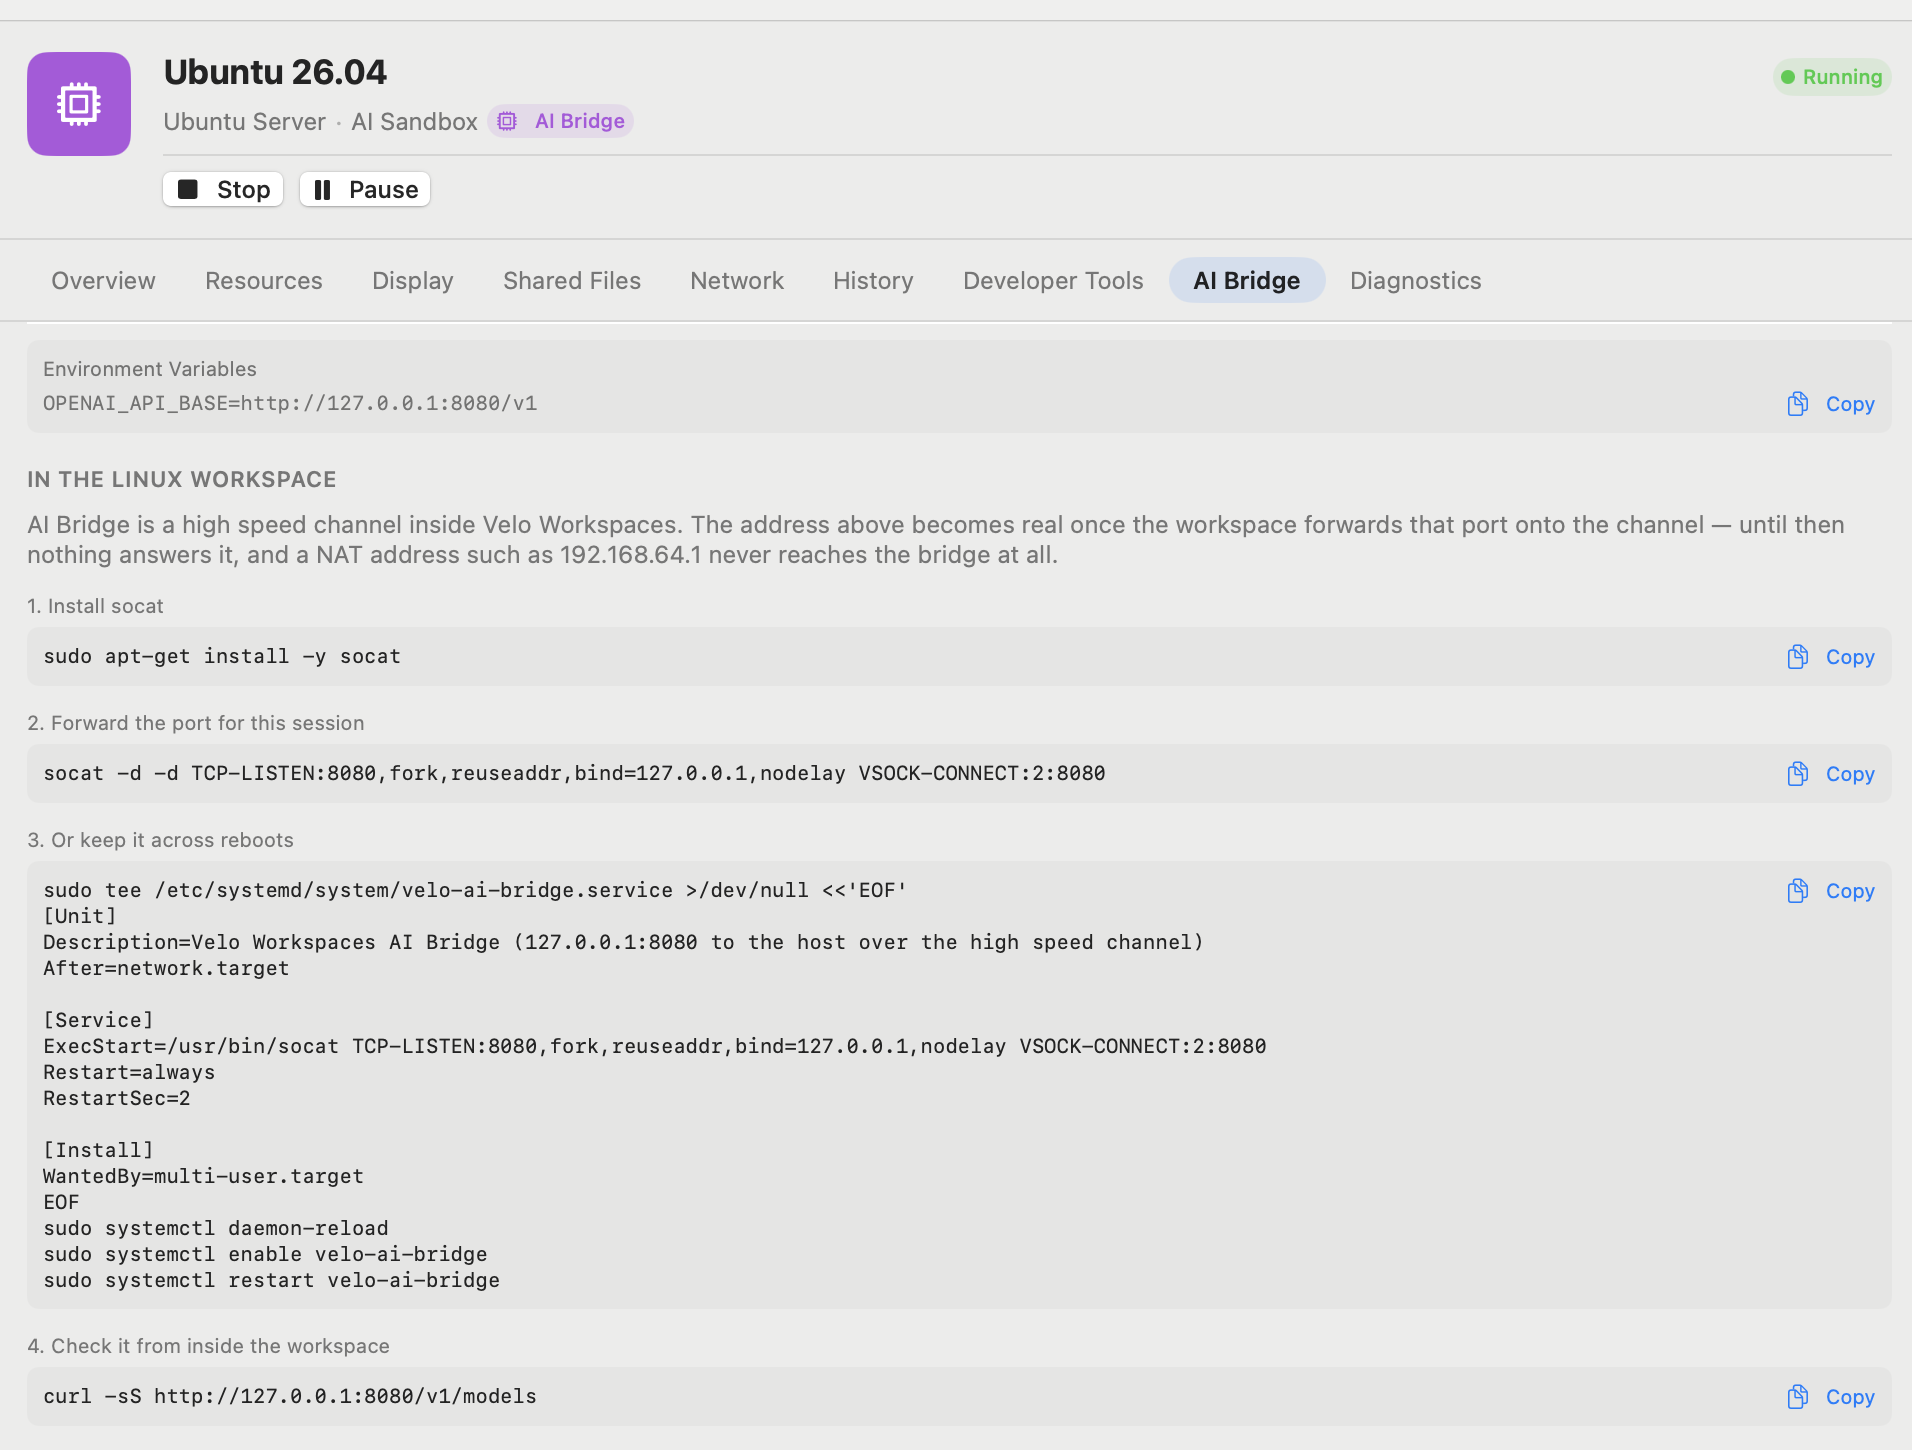
# 1. Install socat
sudo apt-get install -y socat

# 2. Forward the port for this session
socat -d -d TCP-LISTEN:<PORT>,fork,reuseaddr,bind=127.0.0.1,nodelay VSOCK-CONNECT:2:<PORT>
— or, to keep it running across reboots —
# 3. Install as a systemd service instead of step 2
sudo tee /etc/systemd/system/velo-ai-bridge.service >/dev/null <<'EOF'
[Unit]
Description=Velo Workspaces AI Bridge (127.0.0.1:<PORT> to the host over the high speed channel)
After=network.target

[Service]
ExecStart=/usr/bin/socat TCP-LISTEN:<PORT>,fork,reuseaddr,bind=127.0.0.1,nodelay VSOCK-CONNECT:2:<PORT>
Restart=always
RestartSec=2

[Install]
WantedBy=multi-user.target
EOF
sudo systemctl daemon-reload
sudo systemctl enable velo-ai-bridge
sudo systemctl restart velo-ai-bridge
Then, either way, verify guest-to-host connectivity across the vsock boundary:
# 4. Check it from inside the workspace
curl -sS http://127.0.0.1:<PORT>/v1/models
If that returns your model's info, the bridge is live — every agent below points at http://127.0.0.1:<PORT>/v1, and each one configures that itself in the next section, so there's no separate global environment-variable setup needed here.
7.2 Configure Agent Frameworks
Agent Option A: OpenCode (CLI & Web UI)
OpenCode provides both an automated CLI agent and an interactive web workspace.
-
Install OpenCode and its build dependencies:
sudo apt install -y curl git build-essential curl -fsSL https://opencode.ai/install | bash source ~/.bashrc -
Register your inference engine as a provider. Create
~/.config/opencode/opencode.json:
Paste this, substitutingmkdir -p ~/.config/opencode nano ~/.config/opencode/opencode.json<PORT>and the model name for your chosen engine (from Section 3):{ "$schema": "https://opencode.ai/config.json", "provider": { "local": { "npm": "@ai-sdk/openai-compatible", "name": "Local Server", "options": { "baseURL": "http://127.0.0.1:<PORT>/v1" }, "models": { "<model-name>": { "name": "<Display Name>" } } } }, "model": "local/<model-name>" } -
Run in non-interactive CLI mode —
--autoauto-approves tool execution inside the sandbox:opencode run --auto "Write a python script to benchmark disk I/O, execute it, and print the results." -
Or launch the interactive TUI, then connect via its wizard instead of (or in addition to) the config file:
Inside the TUI, typeopencode/connect, select Local Server, and when prompted for an API key, type anything (e.g.local) — the local server doesn't check it. -
Or run the web interface, bound to
0.0.0.0so it's reachable across the hypervisor network:
From your Mac's browser:opencode web --port 4096 --hostname 0.0.0.0http://<VM_IP>:4096.
Accessing the Web UI from another PC on your LAN: external machines can't route directly into the VM's private subnet, so forward a port on the host. On the macOS host:
brew install caddy
caddy reverse-proxy --from :8081 --to <VM_IP>:4096
Any machine on the LAN can then navigate to http://<HOST_IP>:8081.
Agent Option B: Open Interpreter
Open Interpreter provides a direct terminal agent loop designed for code execution.
-
Install:
pip install open-interpreter -
Launch against the local endpoint —
-yauto-approves code execution without a confirmation prompt each time:interpreter \ --api_base http://127.0.0.1:<PORT>/v1 \ --model <model-name> \ --api_key local \ -y
Agent Option C: Aider
Aider is designed specifically for Git-integrated pair programming and repository modifications. It reads the endpoint from environment variables rather than dedicated CLI flags, and needs the openai/ prefix on the model name so it routes through its OpenAI-compatible path:
-
Install:
python3 -m pip install aider-chat -
Run inside a Git repository:
cd /path/to/project
export OPENAI_API_BASE=http://127.0.0.1:<PORT>/v1
export OPENAI_API_KEY=local
aider --model openai/<model-name>
Agent Option D: Goose
Goose is an extensible open-source autonomous agent developed by Block.
-
Install:
curl -fsSL https://github.com/block/goose/releases/download/stable/download_cli.sh | CONFIGURE=false bash export PATH="$HOME/.local/bin:$PATH" -
Configure a custom OpenAI-compatible provider:
goose configure # Select: Add Provider → Custom / OpenAI-compatible # Base URL: http://127.0.0.1:<PORT>/v1 # API Key: local # Model: <model-name> -
Start a one-shot autonomous run:
goose run --text "Audit this directory, find security misconfigurations in JSON files, and correct them."
Related reading: the architecture behind AI Bridge, and a benchmark of what it actually costs in inference speed. Or just download Velo Workspaces and try it yourself.