 Velo Workspaces
- Built-in terminal
- Velo's keykept in your Keychain
- Terminal, VS Code
- Keys in ~/.sshid_ed25519 by default
- Key type
- Ed25519without a passphrase, to import
- Time
- About 5 minutesonce per Mac
How keys work in Velo Workspaces
Preferences › Access lists your SSH keys. The one marked Default is “this Mac's key”: the assistant adds it to the account of every workspace it sets up, whether from a cloud image or an automatic install, and Open Terminal signs in with it. If you have no key yet, one is made the first time you create a cloud workspace.
The ssh command and the VS Code block in a workspace's Access tab don't name a key file, so they use your usual keys in ~/.ssh. If the workspace only knows Velo's key, they're turned away with Permission denied (publickey). There are two ways to fix that:
- Option 1, import your key: best if you already use
~/.ssh/id_ed25519with servers and VS Code. Velo Workspaces signs in with it too, and gives it to new workspaces. - Option 2, export Velo's key: best if your workspaces already trust Velo's key. Save it in
~/.sshand tellsshto use it.
Option 1: Import your Mac's own key
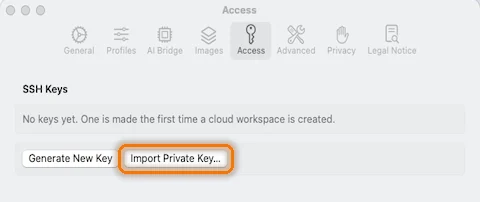
Open Preferences › Access
Click Preferences in the sidebar, choose Access, and click Import Private Key….
 Click to enlarge
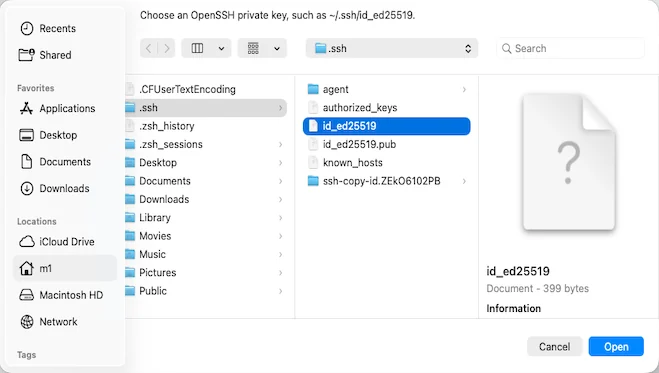
Choose your private key
Select id_ed25519, not id_ed25519.pub. Press ⌘ ⇧ . if the .ssh folder is hidden. Velo Workspaces imports Ed25519 keys only, and not yet ones with a passphrase: remove the passphrase with ssh-keygen -p -f ~/.ssh/id_ed25519, or make a new key.
 Click to enlarge
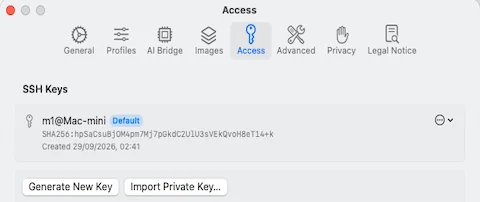
id_ed25519.Make it the default
If the imported key isn't marked Default, choose Make Default from the menu beside it. From now on, new workspaces get this key, and Open Terminal uses it.
 Click to enlarge
Workspaces you created earlier still trust the old key. Add your key to them with ssh-copy-id, or sign in to Open Terminal with the account's password and click Install Key when it offers.
Option 2: Export Velo's key to ~/.ssh
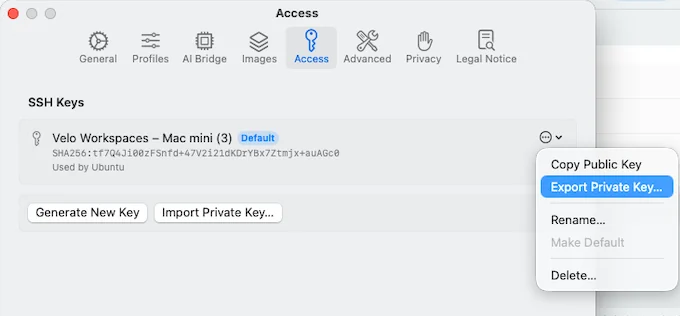
Export the key
In Preferences › Access, open the menu beside the key and choose Export Private Key….
 Click to enlarge
Save it in ~/.ssh
Keep Where on your .ssh folder and the suggested name, velo_workspaces_ed25519, then click Save. Velo Workspaces saves it so only you can read it, which ssh insists on. As the dialog says, anyone with this file can sign in to your workspaces, so keep it private.
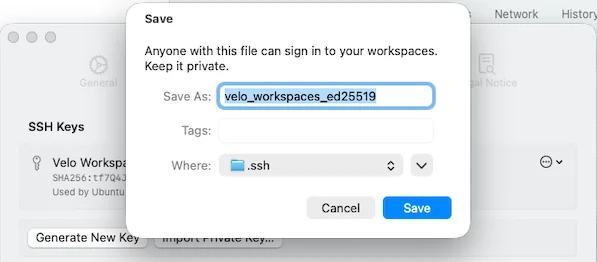 Click to enlarge
~/.ssh/velo_workspaces_ed25519.Tell ssh to use it
Add an IdentityFile line to the workspace's entry in ~/.ssh/config. The next section shows where that entry comes from.
Host ubuntu
    HostName 192.168.65.110
    User luo
    Port 22
    IdentityFile ~/.ssh/velo_workspaces_ed25519
For a one-off, ssh -i ~/.ssh/velo_workspaces_ed25519 luo@192.168.65.110 does the same.
Connect VS Code with Remote-SSH
Install Remote - SSH
In VS Code's Extensions view, install Microsoft's Remote - SSH extension.
Copy the config from the Access tab
In the workspace's Access tab, under VS CODE REMOTE, click Copy SSH Config. It copies a Host block named after the workspace, with its address and your username.
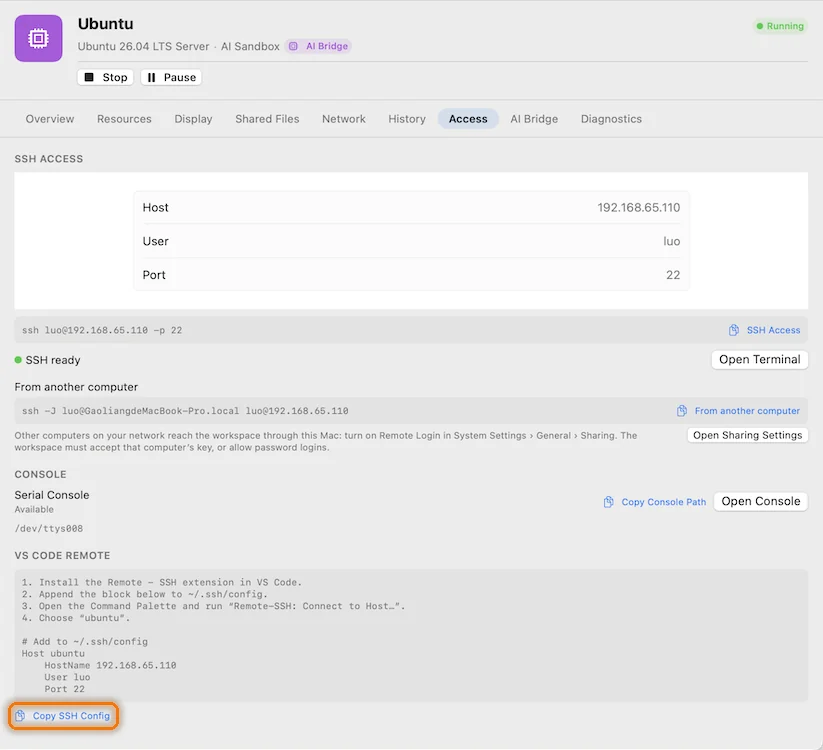 Click to enlarge
Add it to ~/.ssh/config
In VS Code, press ⌘ ⇧ P, run Remote-SSH: Open SSH Configuration File…, choose ~/.ssh/config and paste. If you went with option 2, add the IdentityFile line.
Connect
Press ⌘ ⇧ P again, run Remote-SSH: Connect to Host… and pick the workspace. The first time, VS Code installs its server in the workspace, then opens a window connected to it. Terminals, extensions and the file tree in that window all run in the VM.
From another computer
The Access tab also shows an ssh -J command for other computers on your network. It hops through your Mac, so turn on Remote Login in System Settings › General › Sharing first (the Access tab has a button for it). The workspace has to accept that computer's key, or allow password logins.
Troubleshooting
Permission denied (publickey)
The workspace doesn't trust any key ssh offered. ssh -v lists the keys it tried; use one of the two options above so they match.
The workspace's host key has changed
That's expected after you reinstall the guest or restore it from a restore point. The built-in terminal shows both keys and a Trust New Key button. For Terminal and VS Code, remove the old entry with ssh-keygen -R 192.168.65.110, using the workspace's address. If you did neither, don't trust the new key. Putting an SSH terminal inside a sandboxed Mac app explains how the built-in terminal checks host keys.
SSH ready never appears
Velo Workspaces needs Local Network access to reach workspaces. Turn it on in System Settings › Privacy & Security › Local Network; the Access tab has a button that opens it.